With its declarative approach to defining views, SwiftUI makes it super easy to build great apps. When using SwiftUI, one of the most essential questions to answer is regarding how to properly declare data dependencies. The answer we choose greatly affects how a view behaves during updates over its lifetime.
Not properly declaring dependencies could lead to bugs where:
- our view state refreshes to its initial value due to a view update
- our view displays stale state even though the underlying model has been updated/changed.
Bugs like (1) usually arise as a result of using @ObservedObject in areas where @StateObject should have been used, while bugs like (2) arise when using @StateObject in views where @ObservedObject should have been used.
In this post, we’ll investigate the implications of using @ObservedObject & @StateObject for declaring data dependencies in your SwiftUI code in an effort to discover the best situations to use each of them.
Background
There are 6 main methods to declare data dependencies for a view in SwiftUI.
- @State
- @Binding
- @StateObject
- @ObservedObject
- @EnvironmentObject
- @Environment
@State & @Binding are used for value types. @State asks SwiftUI to create and manage persistent storage for the data type and binds the view to changes to that state. @Binding on the other hand does not get its own storage, but instead is used to keep a reference to an existing state. Note that @Binding does not own the data. Consequently, changes made to an @Binding property do not directly trigger an update for the view bound to the @Binding property, but instead causes a change in the underlying parent’s @State. This in turn triggers an update to the parent view that could cascade down the view hierarchy to other dependencies (including the view from where the change originated).
@StateObject & @ObservedObject are the equivalent of @State & @Binding respectively, but for reference types. @StateObject declares ownership of the data, while @ObservedObject only binds a view to changes to the object without claiming ownership of the data.
@EnvironmentObject & @Environment are used to inject ObservableObject data models directly into the environment, allowing dependent views to directly consume them directly from the environment without having to explicitly pass data model down the view hierarchy.
There are a lot of other great resources that go into more detail on all the 6 methods mentioned above. Here are some of my personal favourites:
- A guide to SwiftUI’s state management system
- All SwiftUI property wrappers explained and compared
- Data Essentials in SwiftUI - WWDC 2020 video
The rest of this post will focus specifically on @ObservedObject & @StateObject in order to illustrate the implications of using them when declaring dependencies for your views, and also how they are affected by view updates.
Setting the stage
We’ll be using a simple data model for this exercise.
class ViewModel: ObservableObject {
	let id: String
	let parentViewType: String

  @Published
  private(set) var refreshCount = 0

  init(id: String = UUID().uuidString, viewType: String) {
		self.id = id
		self.parentViewType = viewType
		print("+++++ [\(type(of: self))]   initialized for \(parentViewType) with id: \(id)")
	}

	deinit {
		print("----- [\(type(of: self))] deinitialized for \(parentViewType) with id: \(id)")
	}

	func refresh() {
		refreshCount += 1
	}
}
We want to be able to keep track of the lifecycle of our data model across view updates. Adding print statements to the init and deinit allows us to achieve this. Since we’ll be creating multiple instances of this model, we also associate an id with the model and include that in the print statement in order to easily identify all instances of our data model at any given point in time.
Now that we have our data model, lets first look at the behaviour of views that declare dependencies using @ObservedObject
@ObservedObject
Using @ObservedObject to declare dependencies on a data model binds a view to that data model which enables it to react to changes by updating its body property. Using @ObservedObject also means that the view does not own the data model. Okay definitions aside, that sounds great, but what does this really mean?
One way to think about this is that if a child view uses @ObservedObject to declare a data dependency, SwiftUI will assume that there is something else that owns the responsibility of keeping a strong reference to the data model. That “something else” could be a parent view further up the view hierarchy.
So let’s see how this looks in code! In the following snippet, we define a view called ObservedObjectView that uses the @ObservedObject construct to declare a data dependency with our ViewModel class from earlier. The view currently just displays its type, the viewModel.id and the viewModel.refreshCount . We also add the ability to trigger a state change by using an onTapGesture.
struct ObservedObjectView: View {
    @ObservedObject var viewModel = ViewModel(parentViewType: "ObservedObjectView")

    var body: some View {
        HStack {
            Spacer()
            Text(String("[\(type(of: self))]\nid: \(viewModel.id)\nRefresh count: \(viewModel.refreshCount)"))
            Spacer()
        }
        .multilineTextAlignment(.center)
        .padding()
        .background(RoundedRectangle(cornerRadius: 20.0).fill(Color.gray))
        .contentShape(Rectangle())
        .onTapGesture {
            viewModel.refresh()
        }
    }
}
This seems to be working as expected, but a single view is no fun. Let’s make this more interesting by embedding our ObservedObjectView in a parent view with its owns state. In the snippet below, we create a Container view that renders the ObservedObjectView in its body. The Container view has its own refresh count which is separate from the refresh counter displayed by the ObservedObjectView from above. We want to be able to trigger an update on the Container without child being updated, so we add a Refresh View button to the container.
struct Container: View {
    @State var refreshCount = 0

    var body: some View {
        VStack {
            VStack(spacing: 32.0) {
                Text("Container Refresh count: \(refreshCount)")

                ObservedObjectView()
            }
            .padding()

            Spacer()

            Button {
                refreshCount += 1
            } label: {
                Text("Refresh View")
                    .padding()
                    .background(
                        RoundedRectangle(cornerRadius: 10.0)
                            .fill(Color.accentColor)
                    )
            }
            .foregroundColor(.white)
        }
        .padding()
        .frame(width: 600.0, height: 400.0)
    }
}
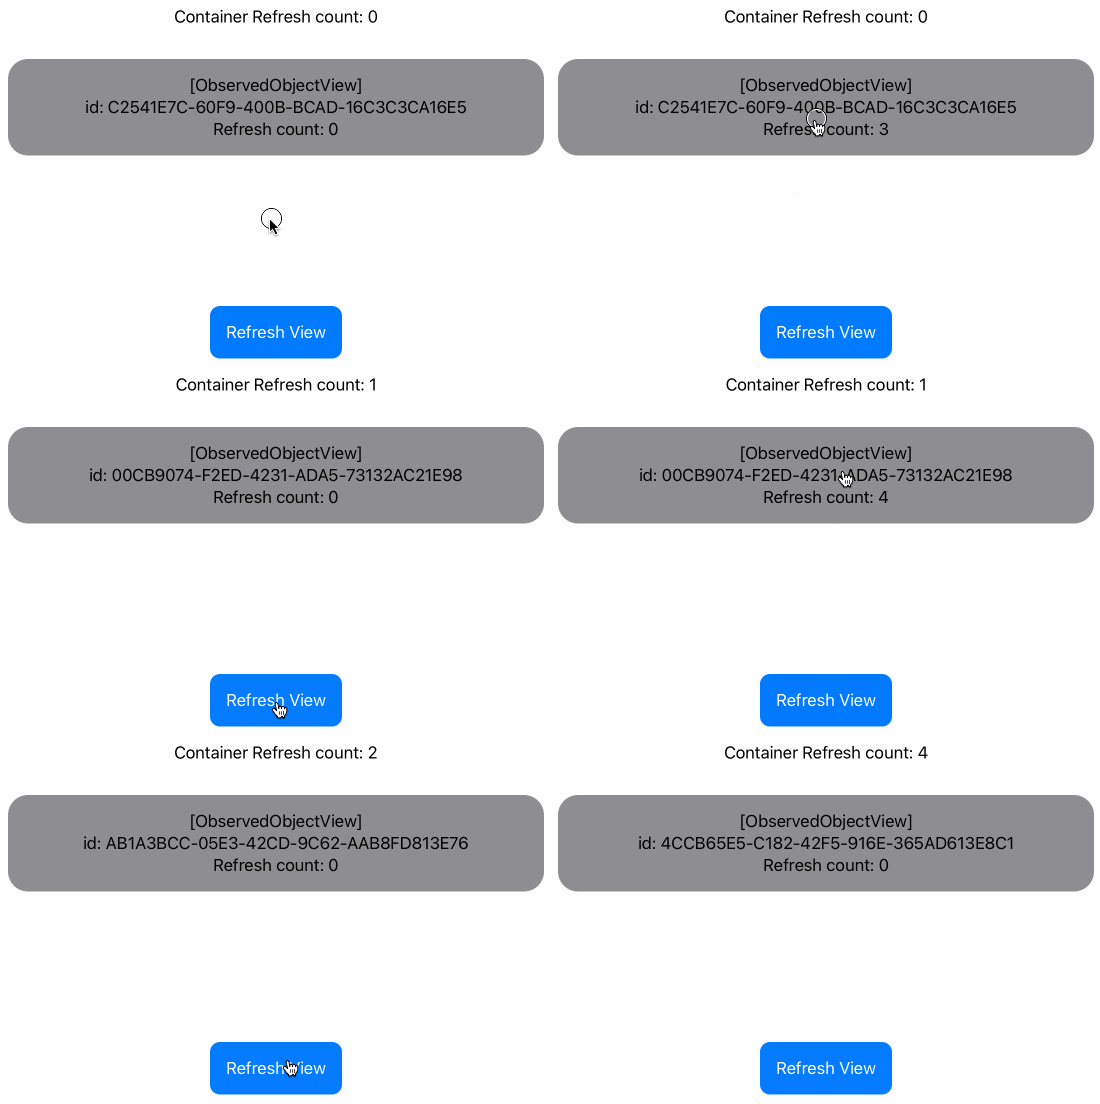
Tapping on the Refresh View button does refresh the container, but now notice that the ObservedObjectView is also being updated. Even worse, it looks like the id of the data model tracked by the ObservedObjectView is changing.
Looking at our trusty print logs that we added to our data model on init and deinit, we can see a better explanation of what’s going on. I have added comments to indicate the start of each Refresh View tap event.
// View appears
+++++ [ViewModel]   initializing (ObservedObjectView) id: C2541E7C-60F9-400B-BCAD-16C3C3CA16E5

// 1st `Refresh View` button tap
+++++ [ViewModel]   initializing (ObservedObjectView) id: 00CB9074-F2ED-4231-ADA5-73132AC21E98
----- [ViewModel] deinitializing (ObservedObjectView) id: C2541E7C-60F9-400B-BCAD-16C3C3CA16E5

// 2nd `Refresh View` button tap
+++++ [ViewModel]   initializing (ObservedObjectView) id: AB1A3BCC-05E3-42CD-9C62-AAB8FD813E76
----- [ViewModel] deinitializing (ObservedObjectView) id: 00CB9074-F2ED-4231-ADA5-73132AC21E98

// 3rd `Refresh View` button tap
+++++ [ViewModel]   initializing (ObservedObjectView) id: 35ACACC5-4778-4A86-A682-9B595748238F
----- [ViewModel] deinitializing (ObservedObjectView) id: AB1A3BCC-05E3-42CD-9C62-AAB8FD813E76

// 4th `Refresh View` button tap
+++++ [ViewModel]   initializing (ObservedObjectView) id: 4CCB65E5-C182-42F5-916E-365AD613E8C1
----- [ViewModel] deinitializing (ObservedObjectView) id: 35ACACC5-4778-4A86-A682-9B595748238F
From the logs, we can see that on each tap of the Refresh View button, two things happen:
- A new instance
ViewModelis created, along with a newObservedObjectView - The new view from (1) is used to replace the latest view body which then causes the older
ViewModelinstance from before the tap event to be reinitialized.
So why is this happening?
This has to do with the fact that our ObservedObjectView declares its dependency on ViewModel with @ObservedObject (remember that @ObservedObject implies that the view is only dependent on the data model, but does not own it). As a result, each update of the Container causes SwiftUI to also recreate a new ObservedObjectView which internally creates a ViewModel.
One way to fix this is to create the ViewModel in the container and inject it into the ObservedObjectView on creation. While this fixes the current issue, it just creates the exact same issue on the Container. This is where @StateObject comes in.
@StateObject
At first glance, there isn’t much of a difference between @ObservedObject and @StateObject. Both can be used to declare dependencies on a data model for a view. To show this, here is the similar view to ObservedObjectView that instead uses @StateObject in place of @observedObject. To avoid confusion when comparing between the two, the @StateObject view equivalent will be called StateObjectView.
struct StateObjectView: View {
    @StateObject var viewModel = ViewModel(parentViewType: "StateObjectView")

    var body: some View {
        HStack {
            Spacer()
            Text(String("[\(type(of: self))]\nid: \(viewModel.id)\nRefresh count: \(viewModel.refreshCount)"))
            Spacer()
        }
        .multilineTextAlignment(.center)
        .padding()
        .background(RoundedRectangle(cornerRadius: 20.0).fill(Color.indigo))
        .contentShape(Rectangle())
        .onTapGesture {
            viewModel.refresh()
        }
    }
}
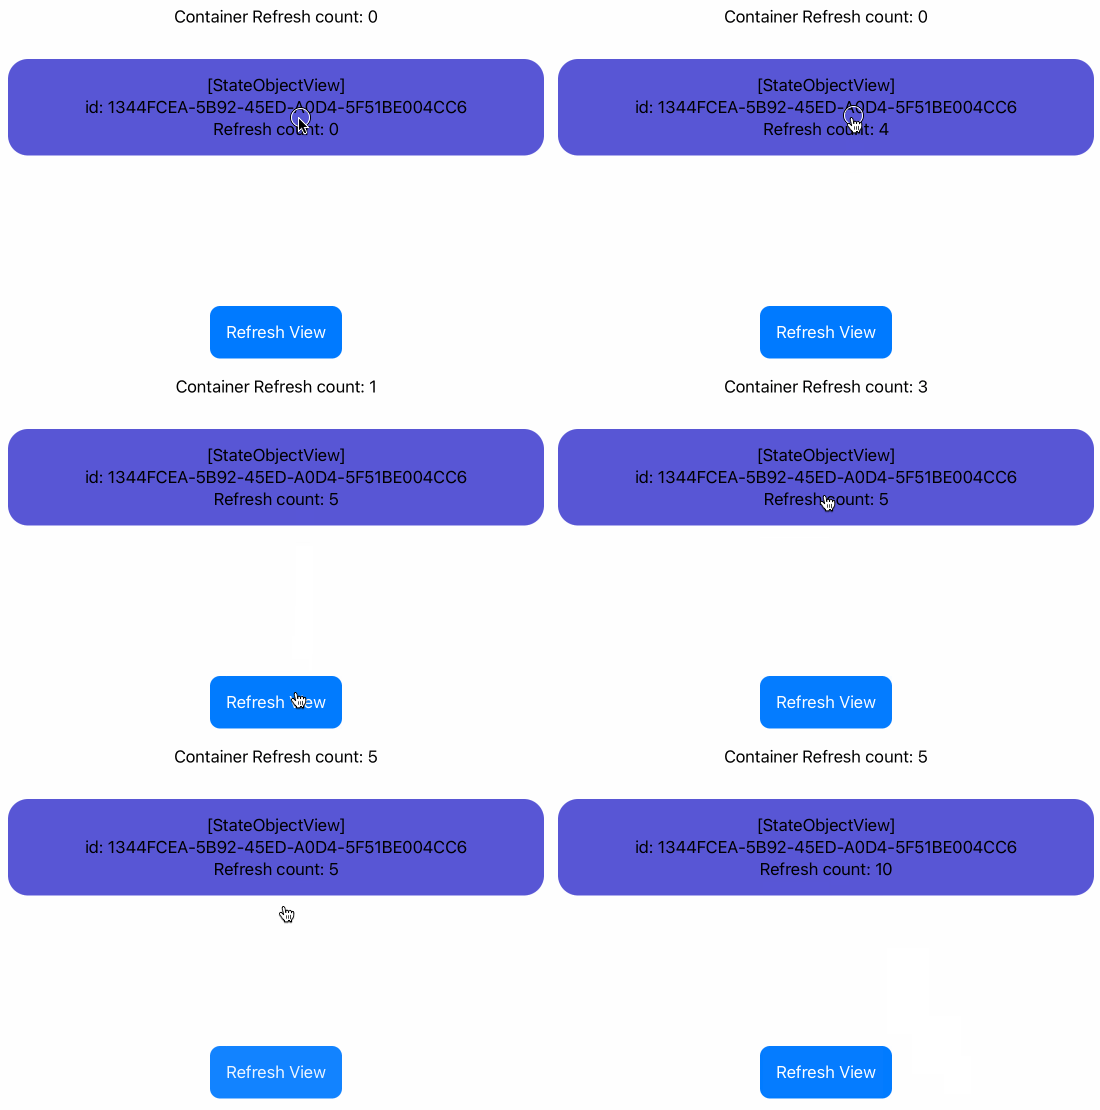
As you can see, our StateObjectView in isolation behaves exactly the same as our ObservedObjectView, but let’s see what now happens when we embed the StateObjectView in a parent view. To do this, we use the same Container view defined in our @ObservedObject section, but instead of rendering an ObservedObjectView in the Container view’s body, we will render our StateObjectView.

Voila! We are able to update the Container view’s state without causing a new ViewModel to be created. Let’s also see how our print logs look for this:
+++++ [ViewModel] initializing (StateObjectView) id: 1344FCEA-5B92-45ED-A0D4-5F51BE004CC6There you have it! Our print logs also tell us a similar story. We only initialize a single ViewModel and that persists between all updates of our StateObjectView.
If you’re wondering how this works behind the scenes. The hint can be found by looking at the @StateObject ’s init function signature:
init(wrappedValue thunk: @autoclosure @escaping () -> ObjectType)The autoclosure is the magic that makes this possible. @autoclosure is syntactic-sugar that allows us to easily turn an expression into a closure. This means that the ViewModel(…) initialization expression that we pass to our @StateObject in the StateObjectView is not executed immediately, but is converted into a closure and stored. SwiftUI executes the closure only once first time the body property is executed, and holds on to the ViewModel instance. Subsequent invocations of the body property use that same ViewModel instance for updates.
When to use @ObservedObject vs @StateObject
Now that we know more about how @ObservedObject and @StateObject work with SwiftUI views, we can now answer the question of when to use one versus the other. Keep in mind that in some cases you may want to use neither of them in favour of a simple var/let property declaration.
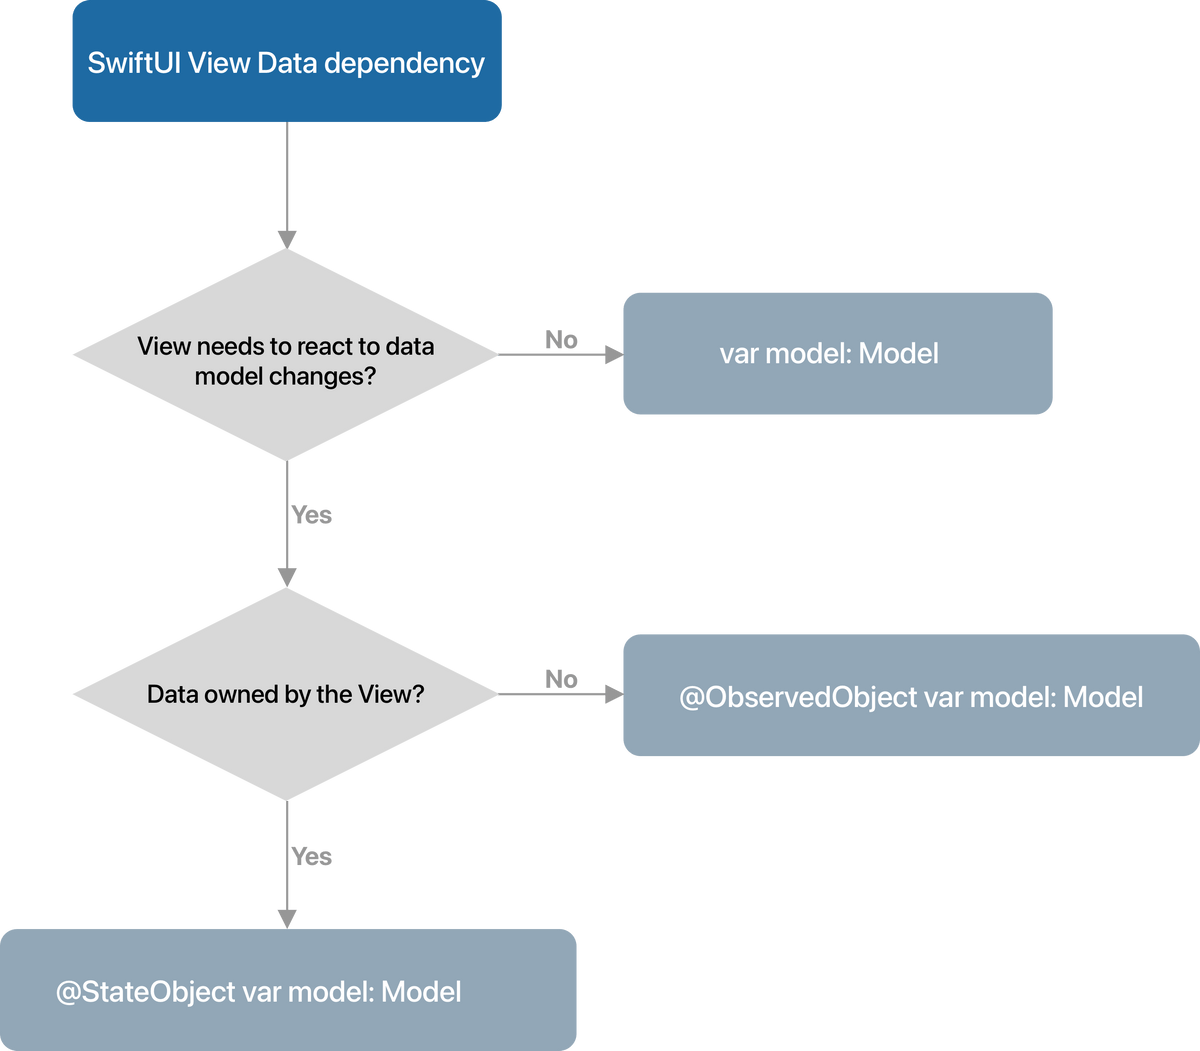
We recommend the following flow chart when trying to decide on what data dependency method to use

If your view only needs to render contents of the data model, and doesn’t care for changes to the data model, a simple var/let property declaration will suffice. If your view needs to update when the data model changes, then your choices are @ObservedObject or @StateObject. The deciding factor is whether or not the view in question is the rightful owner of the data model. If so you should use an @StateObject, otherwise @ObservedObject.
Conclusion
In this post, we dove a bit deeper into how @ObservedObject differs from @StateObject, the implications of using one versus the other, and what factors to consider when deciding which to use. I hope you learned something from this post, and would love to hear your thoughts.
Thanks for taking the time. 🙏🏿
Find me on twitter or contact me if you have any questions or suggestions.
